
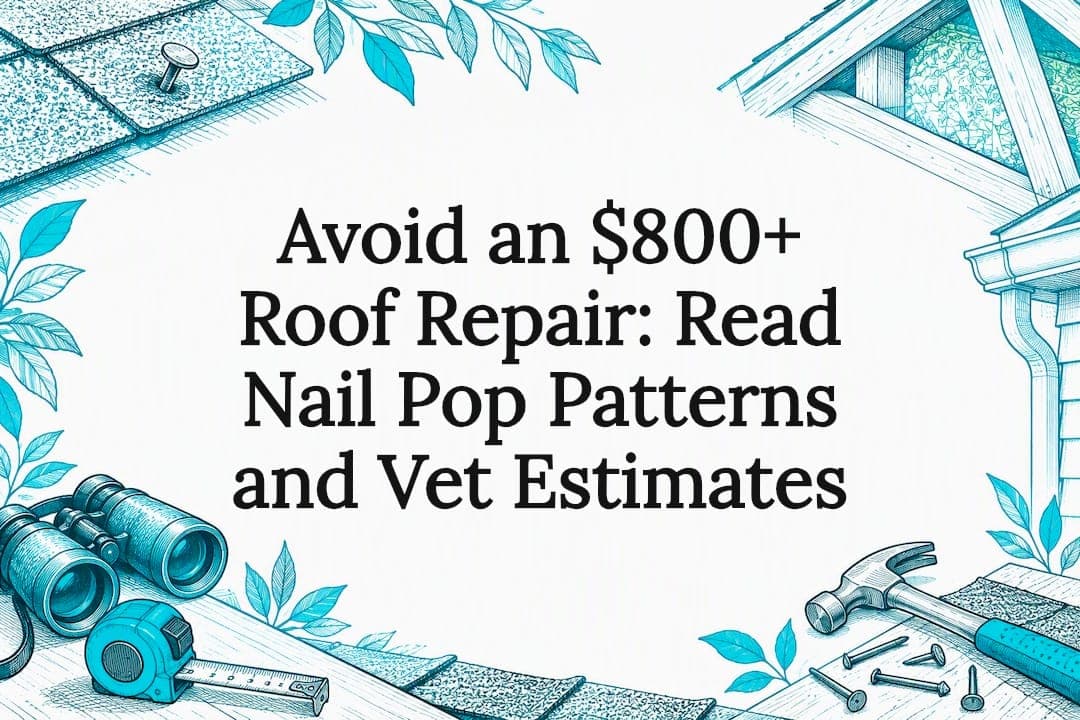
A nail pop is a roofing fastener that has backed partway out of the decking, pushing the shingle above it into a small raised bump. Most isolated pops are a quick, low-cost fix that any competent roofer handles in minutes. Photograph each one, note where it sits on the roof, and schedule an inspection if you count more than a handful or notice them lining up in rows.
TL;DR:
- Most nail pops are a quick fix, but if more than a handful or a pattern of pops appears, underlying decking issues may be involved.
- Nail pops result from fasteners backing out due to thermal cycling, poor installation, or defective nails, especially on south-facing slopes.
- Inspecting for nail pops from the ground or attic helps distinguish isolated failures from signs of decking delamination or widespread failure.
- Proper repair involves removing and relocating nails into solid decking, sealing the old hole, and sealing the new nail to prevent water intrusion.
- Costs range from $50 to $800 depending on the scope, but extensive patterns suggest the need for decking replacement rather than simple fixes.
Table of Contents
- What Causes a Nail Pop on a Roof, Exactly?
- Why Roof Nail Pops Happen: Thermal Cycling, Bad Nails, and Sloppy Installs
- How to Inspect Your Roof for Nail Pops and Read the Pattern
- How Roofers Fix Nail Pops the Right Way
- When Nail Pops Signal Decking Failure and a Bigger Repair
- What Nail Pop Repairs Cost and How Insurance Fits In
- Keeping Nail Pops From Coming Back
- Do Some Roofing Materials Pop Nails More Than Others?
- What Happens If You Ignore a Nail Pop
- Our Take: Read the Pattern, Not Just the Nail
- Get a Nail Pop Inspection Before Small Damage Gets Expensive
- Sources
- FAQ
What Causes a Nail Pop on a Roof, Exactly?
A nail pop happens when a fastener loses its grip in the decking and works its way upward, lifting the shingle above it. Sometimes the nail head stays hidden under the shingle tab; other times it punches straight through, tearing the shingle mat and exposing bare metal to weather. Either way, the fastener that's supposed to hold the shingle flat is now doing the opposite.
From the ground or a ladder, look for these signals:
- A raised bump or ridge running perpendicular to the shingle courses
- A shiny, exposed nail head sitting proud of the shingle surface
- A crease or crack in the shingle directly above the bump
- Granule loss concentrated in a small circle around the raised spot
Don't confuse a nail pop with shingle blistering (soft, irregular bubbles from trapped moisture) or hail pitting (random, dime-sized dents with no raised metal). A true nail pop always has a hard point at its center. That's the fastener.
Why Roof Nail Pops Happen: Thermal Cycling, Bad Nails, and Sloppy Installs
Roofs expand and contract every single day. Decking heats up under summer sun, cools overnight, and repeats that cycle thousands of times over a roof's lifespan. Each cycle nudges a marginal nail a fraction of a millimeter farther out. Over 10 to 15 years, that fraction adds up to a fully backed-out fastener.
Statistic Callout: Industry technical guidance points to the International Residential Code, which sets a minimum fastener standard for asphalt shingles: 12-gauge shank, driven deep enough to penetrate at least 3/4 inch into the sheathing (or clear through thinner decking). Nails that fall short of that spec are far more prone to walking out.
The most common causes, roughly in order of how often we see them:
- Thermal cycling on older roofs, especially south and west facing slopes that see the most sun
- Decking shrinkage, common when builders use green lumber or certain OSB panels that lose moisture and contract over the first few years
- Wrong nails, including smooth-shank fasteners instead of ring-shank nails, which grip sheathing far better and resist withdrawal
- Poor attic ventilation, which traps heat and moisture and speeds up decking movement
- Installation errors, including under-driven nails, over-driven nails that crush the shingle mat, and nails set at an angle instead of flush
A roof recovered with a second layer of shingles over an old roof also experiences more pops, simply because nails have to bite through more material to reach solid decking.
How to Inspect Your Roof for Nail Pops and Read the Pattern
Start on the ground. Walk the perimeter of your house with binoculars and scan each slope in raking light, ideally early morning or late afternoon when shadows make bumps easier to spot. If your roof pitch is low and your ladder skills are solid, a careful walk along the eaves can reveal more. Anything steeper than a 6:12 pitch is a job for a professional, full stop.
Once you've spotted pops, the pattern tells you far more than the count:
- One to five scattered pops, no clear pattern. Usually isolated fastener failures. Straightforward repair, no deeper concern.
- A cluster of pops confined to one slope. Often points to that slope's sun exposure, ventilation, or a batch of bad nails from the original install.
- Pops in straight lines or repeating at regular intervals across multiple slopes. This is the pattern that matters most. Regularly spaced pops along a seam line often mean the decking itself is delaminating, not just the fasteners failing.
Check the attic while you're at it. Look for nail tips poking through the underside of the decking, damp or discolored insulation directly below suspected pop locations, and any sagging between rafters.
Pro Tip: Bring a tape measure into the attic. If you find nail points breaking through in a repeating pattern every 8 to 12 inches along a single sheet seam, that's a strong sign of panel delamination, not simple nail withdrawal. Flag it for your roofer before they climb up.
Stop the DIY approach and call a roofer if you see interior ceiling stains, a soft or springy feel underfoot on the roof, or more than a dozen pops on a single slope.
How Roofers Fix Nail Pops the Right Way
A correct nail pop repair follows the same sequence every time, whether you're paying for one pop or fifty:
- Lift the shingle tab covering the popped nail without cracking it, using a flat pry bar.
- Remove the popped nail entirely. Pulling it, not hammering it back down, is the whole point.
- Seal the old nail hole with roofing cement so water can't track into the decking through the abandoned puncture.
- Drive a new ring-shank nail one to two inches away from the original hole, into fresh decking, seated flush in the shingle's designated nail zone.
- Seal the new nail head with a dab of roofing cement.
- Press the shingle back down and reseal the tab if the factory adhesive strip has broken.
The tools involved are simple: a pry bar, a nail set, ring-shank nails in 12-gauge, and quality roofing or asphalt cement. Nothing exotic. What matters is technique, not equipment.
Here's the mistake we see most often on repair calls: a previous roofer, or a homeowner, simply hammers the same popped nail back down flat. GAF's technical guidance on improperly driven nails is direct on this point. A nail that already backed out has stripped its own hole in the decking. Driving it back into that same compromised hole gives it nothing to grip, and it will pop again, often within a single season. The fix is to relocate the fastener into solid wood, not reuse the failed hole.
A few other shortcuts to watch for when a roofer quotes or performs this work:
- Skipping the sealant step on the old hole, leaving an open path for water
- Using roofing nails with a smooth shank instead of ring-shank, especially on older or shrinkage-prone decking
- Failing to check whether the shingle itself cracked or lost its seal strip, which sometimes means the shingle needs replacing, not just the nail
If a roofer finds soft or rotted decking under a pop, or the shingle mat is torn beyond a small patch, spot repair won't hold. That section needs new decking and new shingles, not another nail.
When Nail Pops Signal Decking Failure and a Bigger Repair
Not every nail pop is a five-minute fix. Pops that repeat every 8 to 12 inches along a single sheet seam, or that follow a rafter line straight across two or three courses, usually mean the decking itself is delaminating rather than a handful of nails simply walking out over time.
A roofer diagnosing this will typically pull a few shingles in the suspect area to look at the plywood or OSB directly, then check the attic floor and rafter bays for matching signs, soft spots, water staining, or visible sag between framing members.
Three findings usually trigger a shift from spot repair to partial reroof:
- Rotted or soft sheathing that no longer holds a fastener securely no matter what nail you use
- Severe panel delamination where the wood layers themselves are separating
- Widespread fastening failure, meaning pops across most of a slope rather than a cluster in one corner
At that point, patching individual nails is a temporary fix on a roof that needs new decking underneath the shingles. A roofer who spots this early saves you from paying twice.
What Nail Pop Repairs Cost and How Insurance Fits In
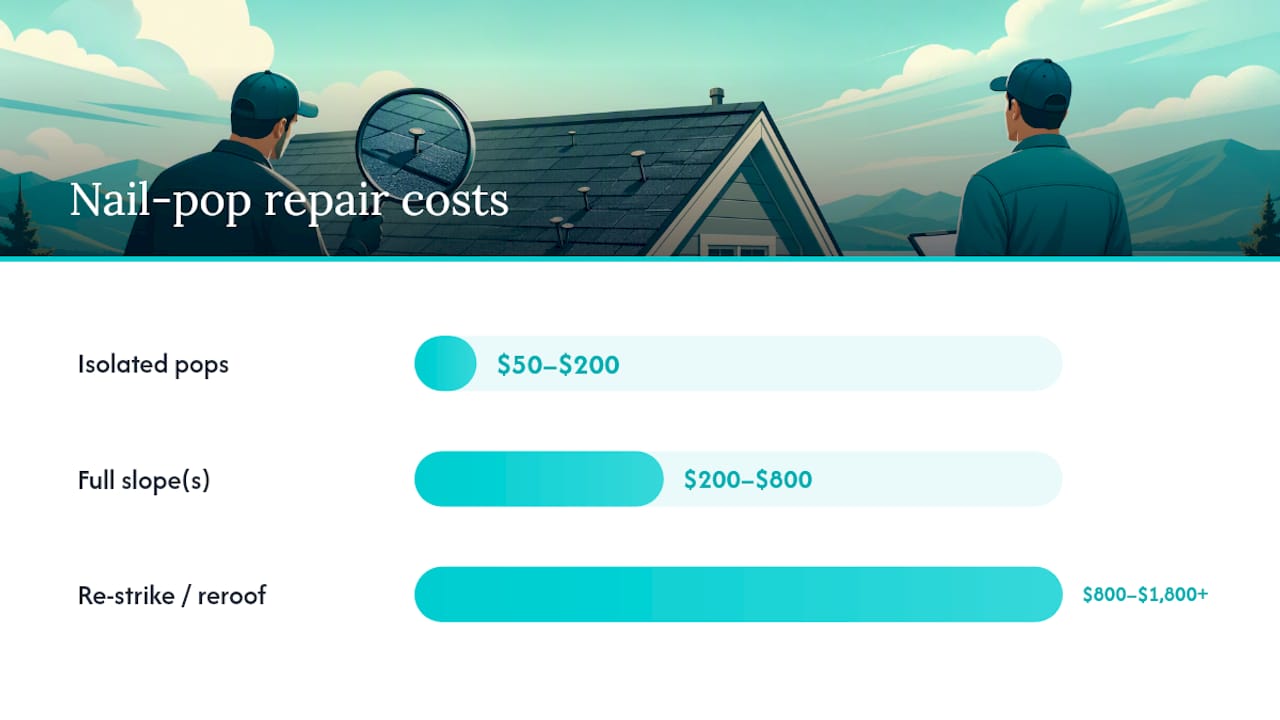
Pricing scales with scope. Typical ranges run from about $50 to $200 for a small handful of isolated pops, $200 to $800 for a medium job covering a full slope or two, and $800 to $1,800 or more for a full re-strike or partial reroof involving decking repair.
Most roofers price this work one of three ways: a flat per-pop rate, an hourly rate with a service-call minimum, or a bundled inspection-plus-repair fee. What moves the number most is roof height, pitch, and how many separate areas need attention rather than raw pop count alone.
Statistic Callout: Insurance adjuster guidance is consistent on one point: nail pops are typically classified as a maintenance or workmanship issue, not a named peril, so standard homeowners policies usually don't cover them. The exception is when pops are tied directly to storm damage, wind uplift severe enough to be documented, or hail impact in the same claim window. If you suspect that link, photograph everything with timestamps before any repair work begins.
When you get an estimate, ask these questions directly:
- What nail type and gauge will you use?
- What penetration depth are you targeting into the decking?
- Will you inspect the attic and decking before quoting a final price?
- What warranty covers the repaired area?
Keeping Nail Pops From Coming Back
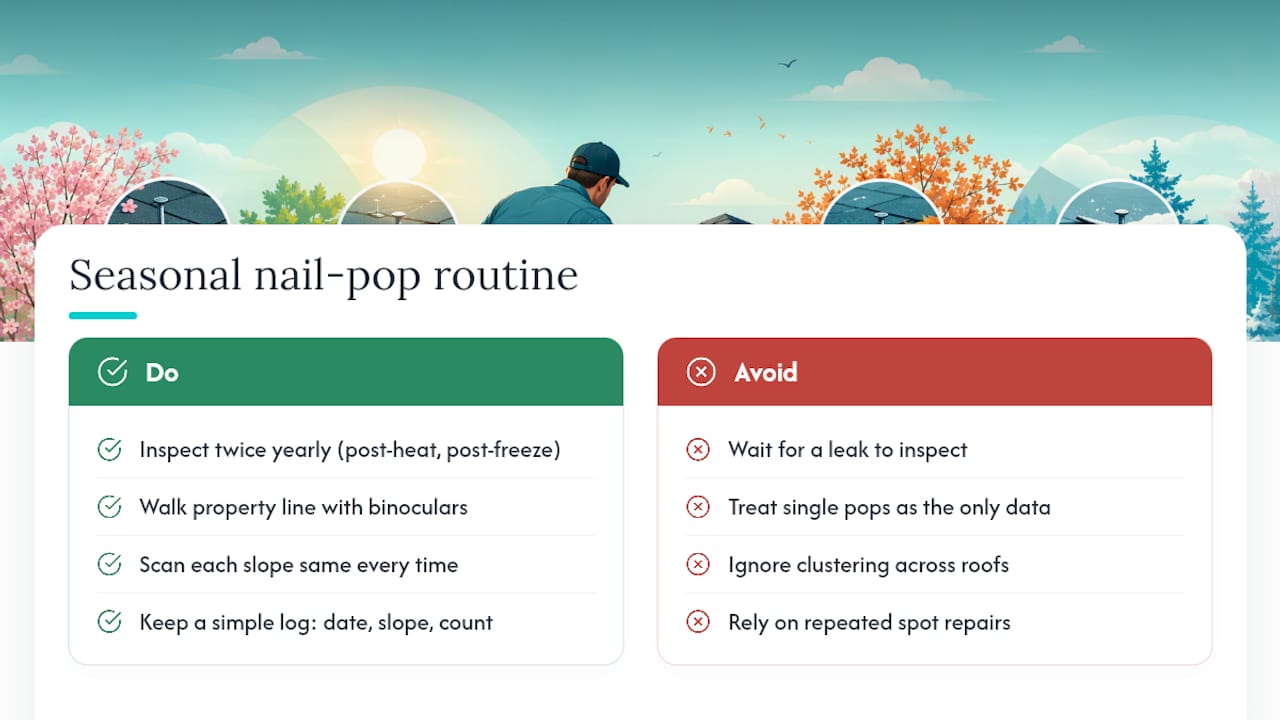
A repaired nail pop is only as good as the roof's next few years of expansion and contraction. Build a light inspection habit into your seasonal routine rather than waiting for a leak to force the issue. Twice a year, once after the worst of summer heat and once after the first hard freeze, walk your property line with binoculars and scan each slope the same way you did during your original inspection.
Keep a simple log. A phone note with the date, slope, and rough count of any new bumps you spot is enough. Patterns matter more than single data points, and a log lets you see whether pops are appearing randomly or clustering in the same spot roof after roof. If the same slope keeps producing new pops after a repair, that's a sign the underlying cause, usually ventilation or decking condition, was never addressed the first time.
Attic checks matter just as much as roof-surface checks. Twice a year, look for new nail tips breaking through the decking, fresh water staining, or insulation that feels damp without an obvious source. Catching a new pop from the attic side, before it ever punctures a shingle from below, is often the cheapest possible intervention.
If your roof is approaching 15 to 20 years old and nail pops start showing up in clusters rather than as isolated incidents, treat that as a signal to schedule a full roof evaluation rather than another round of spot repairs. Aging decking and aging fasteners tend to fail together, not one at a time.
Do Some Roofing Materials Pop Nails More Than Others?
Standard three-tab and architectural asphalt shingles are the material most associated with visible nail pops, mainly because the shingle itself is thin enough that a backing-out fastener creates an obvious raised bump you can see from the ground. That visibility is actually useful. It gives you an early warning system that other materials don't offer in the same way.
Metal roofing uses exposed or concealed fasteners designed with far more holding power and different expansion tolerances, and while metal panels can experience fastener backout at exposed screw points, it tends to show up as a loose panel or a leak around the screw rather than a subtle bump. Thicker material means less obvious visual cues and a repair job that usually calls for panel-specific fasteners rather than a simple ring-shank swap.
Heavier materials like tile or slate rarely pop nails the way asphalt does, since the fasteners sit under the material rather than punching through it directly. But when a fastener does fail under tile or slate, the repair is more invasive because you're lifting rigid material instead of a flexible shingle tab.
For siding, the same underlying mechanics show up in a different form. James Hardie fiber cement siding and other engineered products use their own fastening specs, and getting nail placement and penetration right at install matters just as much for siding longevity as it does for a roof deck.
What Happens If You Ignore a Nail Pop
A nail pop that sits unrepaired doesn't stay static. Documentation on shingle nail pops shows that a lifted shingle loses its flat seal against the shingle below it, which accelerates granule loss right at the point of contact and leaves that spot more exposed to UV degradation than the surrounding roof.
A lifted edge also catches wind. Instead of lying flat against the shingles around it, the raised tab gives wind gusts something to grab, which raises the odds of that shingle tearing loose entirely during a storm rather than just sitting there as a cosmetic nuisance.
The real risk shows up when the exposed nail head or the puncture through the shingle mat becomes a direct path for water. Once that seal is broken, water can track down the nail shank, follow it into the decking, and soak into wood that was never designed to stay wet. That's how a single ignored pop, multiplied across a whole slope over several years, turns into rot, soft decking, and eventually a repair that costs many times more than a same-day nail fix would have.
Our Take: Read the Pattern, Not Just the Nail
Most advice about nail pops focuses on the fastener itself, and that misses the point. The nail is the symptom. The pattern is the diagnosis. A single pop on a south-facing slope of a 12-year-old roof tells you almost nothing worth acting on beyond a quick fix. Five pops in a straight line across a seam tell you the decking is talking to you, and it's worth listening before you're dealing with a soaked attic.
We'd also push back gently on the instinct to grab the cheapest repair quote for this kind of work. A five-minute nail swap is genuinely cheap labor, which means the price difference between quotes usually comes down to whether the roofer is willing to actually inspect the decking and attic before they climb down, not whether they're overcharging you. Cheap and fast without an inspection is how homeowners end up paying for the same repair twice.
Budget Roofing & Siding handles everything from a handful of nail pops to full roof replacements, and our process always includes checking whether what looks like a small nail issue is actually pointing at something bigger underneath. If you're weighing a repair quote, ask for the same pattern check outlined here before you sign anything: document, map, get more than one estimate, and insist on ring-shank fasteners with a real deck inspection behind the price.
— Dan
Get a Nail Pop Inspection Before Small Damage Gets Expensive
Choosing a local roofing service is a strong alternative to guessing your roof's condition from the ground. Reliable providers may offer guarantees on estimates, helping customers compare quotes with confidence instead of wondering if they're overpaying for a fastener fix.

A proper inspection covers more than the visible pops you've already spotted. Our team checks attic decking, ventilation, and the fastening pattern across every slope, because a handful of nail pops sometimes points to a bigger issue and sometimes doesn't, and you deserve a straight answer either way. If storm damage might be involved, we also walk you through documentation and insurance claims guidance so you're not navigating an adjuster conversation alone.
Serving homeowners across Central Texas, from New Braunfels to Schertz and Cibolo, we're ready to take a look. Request a free roofing inspection or estimate and find out exactly what your roof needs, and what it doesn't.
Sources
- Nail Pops on Shingles: Causes, Fix & Bigger Trouble Signs | TRB
- Roof Nail Pops: Causes, Consequences & How to Fix Them | RoofObservations
- Improperly Driven Nails (GAF technical bulletin)
- Shingle nail pops in asphalt shingle roofs | Inspectapedia
- A Claims Adjuster's Guide to Roof Nail Pops - Knight's Solutions
FAQ
Are Roof Nail Pops Normal?
Yes, some degree of nail popping is a normal part of an asphalt shingle roof aging, especially as the decking expands and contracts through seasonal temperature swings. A few isolated pops over 10 to 15 years isn't cause for alarm, but clusters or repeating patterns are not something to write off as normal wear.
Are Roof Nail Pops Covered by Insurance?
Usually not. Insurance adjuster guidance treats nail pops as a maintenance or workmanship issue rather than a covered peril, unless you can document they resulted directly from storm damage like high wind or hail in the same event.
Is It Worth Fixing Nail Pops?
Yes, fixing nail pops early is almost always worth it because the repair is cheap while the pop is isolated, but the same damage left unaddressed can lead to broken shingle seals, faster granule loss, and eventual water intrusion into the decking. A small repair now avoids a much larger one later.
How Much Does It Cost to Fix Roof Nail Pops?
A small handful of nail pops typically runs $50 to $200, while a medium job covering a full slope runs $200 to $800. A full re-strike or partial reroof involving decking repair can run $800 to $1,800 or more depending on scope. Some roofing services provide free estimates so you know the approximate cost for your roof before work begins.