
If your roof is leaking or torn open right now, your first move is containment, not climbing. Put buckets and plastic sheeting under active leaks, photograph the damage from inside and out, and only get on the roof if it's dry, low-sloped, and safe. If any of that isn't true, or the damage looks structural, skip the ladder and call a professional for emergency roof tarping instead.
TL;DR:
- DIY tarping is only suitable for roofs that are low-sloped, safe to access, dry, and free of structural damage; otherwise, professionals should be called.
- The 2x4 anchor method involves extending the tarp 3 to 4 feet beyond the damage, securing it with screws through plywood or furring strips every 12 to 16 inches, and tightening it to shed water effectively.
- Heavy-duty tarps rated 8 to 12 mil can last 30 to 90 days under normal weather and should be inspected regularly for tears, pooled water, or loosened fasteners.
- Insurance typically covers emergency tarping when documented with photos and receipts within 24 to 72 hours, and a professional invoice streamlines the claim process.
- Cost for professional tarp jobs ranges from $175 to $2,000+ depending on roof size, pitch, and timing, with faster response times following storm events.
Table of Contents
- What to Do Right Now: Safety, Containment, and Documentation
- Step-by-Step DIY Tarping: The 2x4 Anchor Method
- Materials, Tools, and What to Expect to Spend
- When to Call a Pro, What It Costs, and How Insurance Handles It
- How Long a Tarp Lasts and What to Check
- A Contractor's Take on Tarping Right vs. Tarping Fast
- Get Emergency Tarping Done Right the First Time
- Sources
- FAQ
What to Do Right Now: Safety, Containment, and Documentation
The first hour after you spot roof damage decides whether you're dealing with a repair bill or a mold problem. Work through these steps in order:
- Clear the danger zone. Move people, pets, and valuables away from sagging ceilings or active leak paths. If water is near outlets or light fixtures, shut off electricity to that area at the breaker.
- Contain the water. Set buckets under drips, lay plastic sheeting over furniture and flooring, and if a ceiling is bulging with trapped water, puncture it carefully at the low point to release it in a controlled way rather than letting it collapse.
- Document everything. Photograph the damage from the ground and, if you can safely reach it, from inside the attic. Get wide shots and close-ups, timestamp them, and jot down the date, time, and weather event that caused it.
- Check the roof before you touch it. Look up from the ground. A wet, windy, steep, or visibly sagging roof is not a DIY job. Interior containment is the only safe option until conditions and access are safe.
These four steps protect your family, your belongings, and your insurance claim, in that order.
Step-by-Step DIY Tarping: The 2x4 Anchor Method
This method works if your roof clears every item on this checklist: single story or safely reachable by ladder, pitch at or under roughly 6/12, a dry deck, and a helper on the ground. If you can't check all four boxes, a conservative safety checklist says this becomes a job for a professional, not a weekend project.
- Measure the damage. Extend your tarp coverage 3 to 4 feet beyond the visible hole in every direction, and drape it over the roof ridge when the damage is near the peak so water sheets off instead of pooling behind the tarp.
- Prep the surface. Photograph the area first, clear loose debris and broken shingles, and cover any large holes with a piece of plywood so the tarp has a solid, level surface to lie against.
- Lay the tarp. Unroll it over the damaged area and the ridge, centering it so no part of the hole is within a few feet of an edge.
- Anchor with the 2x4 sandwich technique. Roll each edge of the tarp around a straight length of 2x4, then drive 2.5 to 3 inch screws through the board, through the tarp, and into solid roof decking every 12 to 16 inches. This anchor board method holds up in wind far better than loose sandbags, which shift and let the tarp flap loose.
- Tension and seal. Pull the tarp taut before final fastening so rainwater can't pool in the slack, then run butyl or flashing tape around pipe boots, vents, and any other penetrations. Check it again after the first hard rain.
Pro Tip: A tarp that's pulled drum-tight sheds water. A tarp with even a little sag becomes a swimming pool during the next downpour, and that weight is exactly what tears fasteners loose.
Materials, Tools, and What to Expect to Spend
Buy heavy-duty poly or vinyl tarp rated 8 to 12 mil. Contractor-grade material in that range holds up to sun and wind far longer than the thin blue tarps sold at most hardware stores.
- Tarp: 8 to 12 mil poly or vinyl, sized to cover 3 to 4 feet beyond the damage on all sides.
- Lumber and fasteners: 1x4 or 2x4 furring strips, 3 inch deck screws or cap nails, plus plywood sheets for any large openings.
- Safety gear: a stable ladder setup, a harness for anything beyond a single story, work gloves, eye protection, and non-slip boots.
DIY material costs typically run $30 to $150, depending on tarp grade, roof height and pitch, and whether you're buying at 2 a.m. during a storm rush versus a normal Tuesday afternoon.
When to Call a Pro, What It Costs, and How Insurance Handles It
Call a professional the moment your roof is wet, steep, multi-story, or shows signs of structural sag. Professionals carry fall protection gear and training that homeowners typically don't, which is exactly the gap OSHA's fall-protection and ladder guidance is built to address. Roofs pitched steeper than about 6/12, or decking that's soft, wet, or unstable, cross the line into unsafe DIY territory no matter how careful you are.
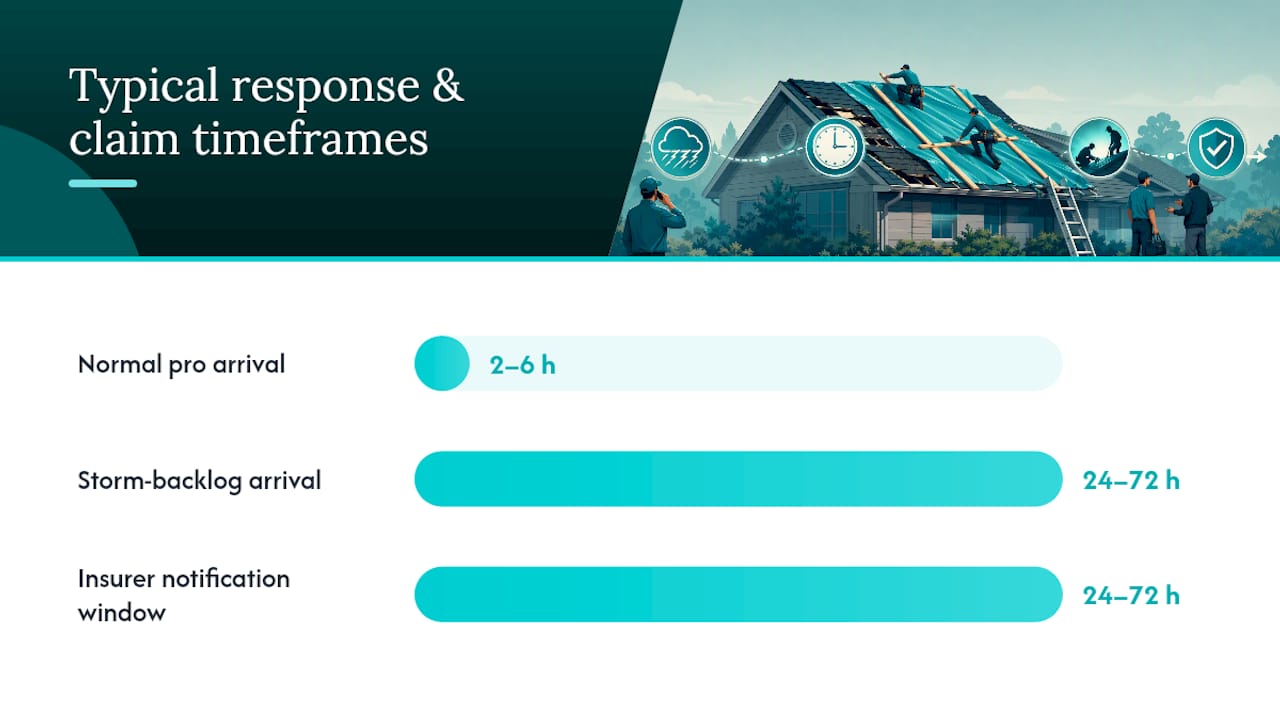
Response times vary by demand. In normal conditions, many pros arrive within 2 to 6 hours, but a major storm event can push that wait to 24 to 72 hours as crews work through a backlog.
| Job type | Typical cost range |
|---|---|
| Small to moderate professional tarp job | $175 to $700 |
| Larger, steep, or multi-story job | $400 to $2,000+ |
| After-hours or storm-surge emergency call | Add a surcharge on top of standard rates |
Most homeowners insurance treats tarping as reasonable emergency mitigation and reimburses it when documented properly. Photograph the damage before and after the tarp goes on, save every receipt and invoice, and notify your insurer within 24 to 72 hours of the event. A reputable contractor will hand you an itemized invoice, before/after photos, and sometimes moisture readings, all of which strengthen your claim and set up the permanent repair that follows.
How Long a Tarp Lasts and What to Check
A properly installed tarp is a bridge, not a fix. Heavy-duty contractor-grade tarps can hold for 30 to 90 days under normal weather, while thinner consumer tarps degrade faster as UV exposure and wind cycles work the material loose.
- Inspect after every significant wind or rain event, and at least once a week otherwise.
- Watch for flapping edges, pooled water on the surface, tears near fasteners, and anchor boards that have started to loosen.
- Schedule the permanent repair as soon as possible. A tarp left in place too long invites mold growth, deck rot, and complications when you eventually file for full repair coverage.
A Contractor's Take on Tarping Right vs. Tarping Fast
Most homeowners rush the tarp and skip the documentation, then wonder why their insurance claim drags on for weeks. Get the photos first, every time, even when water is actively coming through the ceiling. It costs you thirty seconds and it's the difference between a smooth reimbursement and an argument with an adjuster.
Budget Roofing and Siding works Central Texas roofs after every kind of storm, and the pattern holds: homeowners who document before they cover up get paid faster and get straighter answers about what's actually salvageable. Get more than one estimate before committing to permanent repairs, and if your roof has any pitch or height to it, let a pro handle the tarp. Coordinating the insurance side during the repair process can save you additional follow-up calls later.
— Dan
Get Emergency Tarping Done Right the First Time
The emergency tarping service comes with a Best Price Guarantee, so you're not stuck wondering if you overpaid for a same-day fix while your ceiling is still dripping. Central Texas storms don't wait for business hours, and neither does a torn roof deck.

Calling a local roofing crew can provide a damage assessment, tarp installation, and documentation with photos and an itemized invoice for your insurer. From there, scheduling the permanent repair is a straight line instead of a second scramble. Get a free estimate on emergency roofing repairs today, and if the same storm damaged your siding, ask about siding repair while the crew is already on-site.
Sources
- OSHA fall-protection and ladder safety guidance
- Temporary Roof Repair: Tarp and Leak Fixes
- Emergency Roof Tarp: Cost, DIY vs Pro, Insurance
- Emergency Roof Tarp: Top 2026 Guide
FAQ
How Do You Emergency Tarp a Roof?
Contain interior water first, photograph the damage, then check whether the roof is dry, low-sloped, and safely accessible. If it is, cover the area with a heavy-duty tarp extending 3 to 4 feet past the damage, anchored with 2x4 furring strips screwed every 12 to 16 inches.
How Much Does It Cost to Tarp a Roof?
DIY materials typically run $30 to $150 depending on tarp grade and roof height. A professional job usually costs $175 to $700 for small to moderate damage, and $400 to $2,000 or more for larger, steep, or multi-story roofs, with after-hours surcharges common during storms.
How Do You Temporarily Cover a Leaking Roof?
If the roof is unsafe to access, contain the leak indoors with buckets and plastic sheeting and wait for safe conditions or a professional. If it's safely accessible, a properly anchored tarp using the 2x4 sandwich method stops most leaks for 30 to 90 days.
How Do You Tarp a Roof After Storm Damage?
Photograph everything before touching the roof, since insurers treat tarping as standard mitigation that's typically reimbursable when documented. Then follow the same anchored tarp procedure, or call a pro like Budget Roofing and Siding if the roof is steep, wet, or structurally compromised.
Will My Insurance Pay for Emergency Tarping?
Most policies cover emergency tarping as reasonable damage mitigation, provided you notify your insurer within 24 to 72 hours and keep before/after photos and receipts. An itemized invoice from a licensed contractor makes the claim process considerably smoother.